Skip to content
WW2 Theatres Theatres of the Second World War
Home / The Pacific Theatre / The Battle of Midway
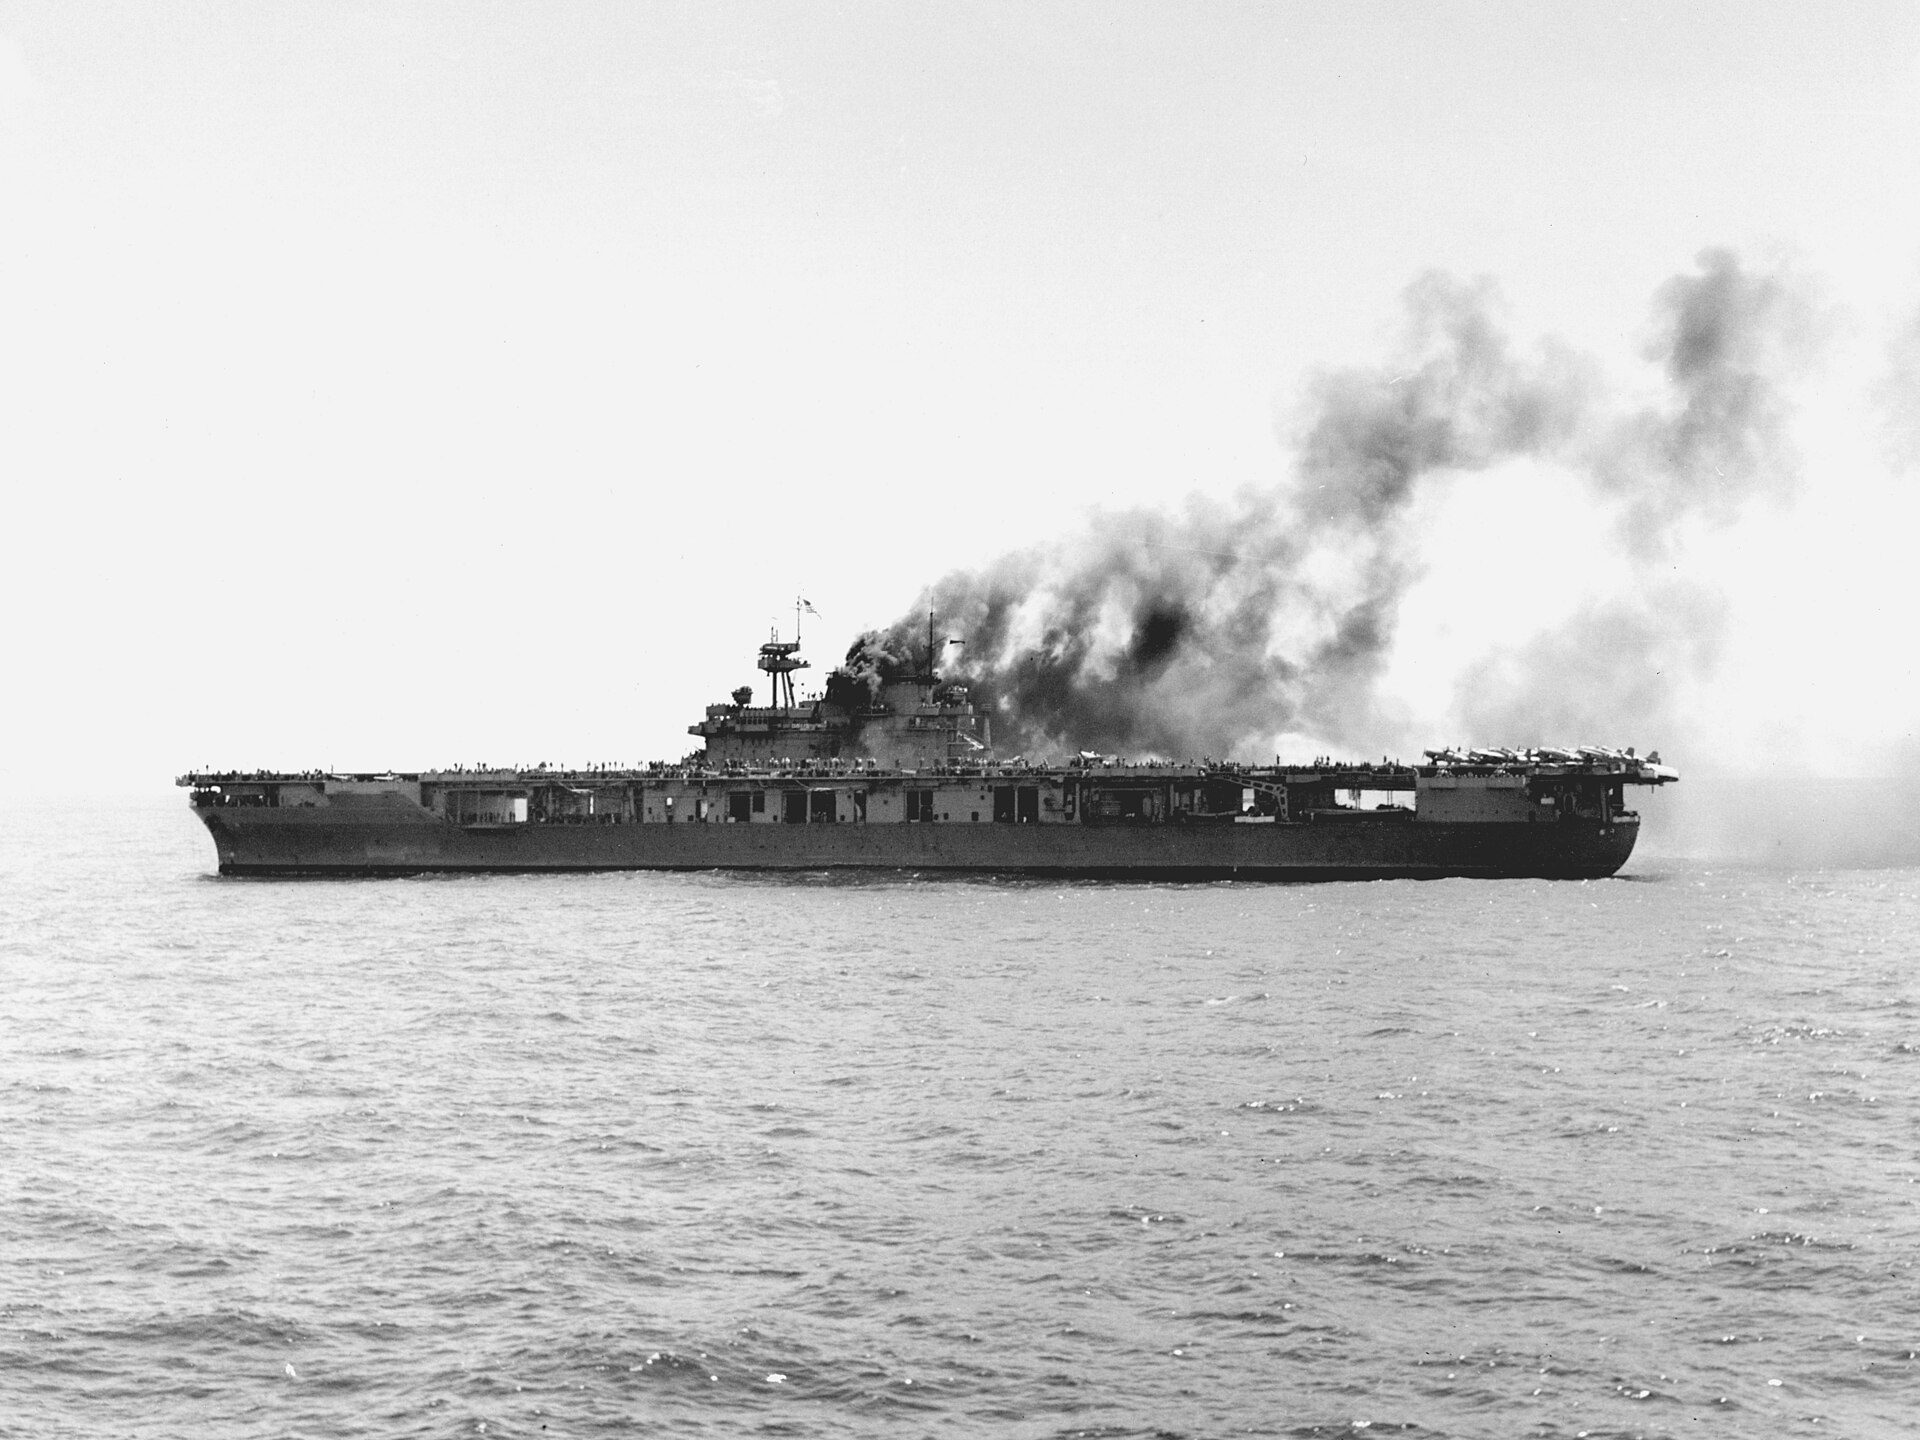
USS Yorktown under attack by Japanese torpedo bombers during the Battle of Midway, 4 June 1942.

The Battle of Midway

4 to 7 June 1942 · The Central Pacific · Four days

Four Japanese fleet carriers were lost in a single day, three of them inside six minutes. The battle was decided before it began, in a basement at Pearl Harbor where a team of cryptanalysts worked out where the Japanese fleet was going and when it would arrive.

USS Yorktown under torpedo attack, 4 June 1942 · US Navy · NARA · Public domain · Source

JAPANESE CARRIERS LOST
FourAkagi, Kaga, Sōryū and Hiryū, all within twelve hours
THE DECISIVE INTERVAL
Six minutesThree carriers fatally hit between 10:22 and 10:26
AMERICAN LOSSES
One carrierYorktown, with the destroyer Hammann, both sunk by one submarine
DEAD
3,057 to 362Japanese to American, a ratio of roughly eight to one
OUTCOME
American victoryWon by intelligence, and by torpedo squadrons that hit nothing
Marker affiliation Allied Axis Other / contested
Map layers

01 / 30

The Ground

Open ocean, and a map that stays still on purpose

There is no ground. Midway is two islets totalling about two and a half square miles, twelve hundred miles from Hawaii, and everything else in this battle happened over water that looks identical in every direction. The fleets never saw each other. Every shot fired at a ship in this action was fired by an aircraft or a submarine.

That makes the map behave differently from a land campaign. There are no force areas to shade, because nobody held anything, so the territory control is not shown at all. What the map carries instead is the shape of the searching and the striking: the arcs the flying boats flew out of Midway, the single Japanese scouting line that mattered, and the strike vectors going out and coming back.

The view deliberately holds one scale through the fighting rather than jumping in and out at each entry. The opening entries sit at Pacific scale because the plan was drawn in Hiroshima Bay and read at Pearl Harbor. From the first entry of 4 June the map settles at one zoom over a box roughly four hundred miles across and stays there, so the eye can follow the movement instead of re-orienting every few seconds.

Command & Decision

American and Japanese, ranks as held in June 1942

Midway is the clearest case in the war of an action decided by intelligence. Station HYPO at Pearl Harbor had partially broken the Japanese fleet code and identified the objective, the date, and the order of battle. Nimitz was therefore able to place three carriers where the Japanese plan assumed there would be none, in an ambush position north-east of the atoll.

The Japanese plan compounded the disadvantage. It divided the fleet across two operations and four groups, spread over a thousand miles, in mutual support of nothing, and it depended on the Americans reacting slowly to a threat they had in fact known about for three weeks. Yamamoto's battleships spent the battle several hundred miles behind the carriers, contributing nothing.

What is easy to miss is how much of the American success was luck arriving on top of preparation. Three torpedo squadrons attacked in succession, achieved not a single hit and were almost wiped out. They also pulled the Japanese fighter cover down to sea level and left the sky above the carriers empty at the exact moment two groups of dive bombers arrived from different directions, having found the fleet by different accidents.

Joseph Rochefort
Commander, United States Navy

Joseph Rochefort

Officer in charge, Station HYPO, Pearl Harbor

Ran the cryptanalytic unit that identified the target, the date and the order of battle, and proved AF was Midway with a false signal about a broken water plant. Washington disputed his estimate, then took credit for it, and had him reassigned to a floating dry dock. His decoration came in 1986, three years after he died.

National Security Agency · Public domain · Source
Chester W. Nimitz
Admiral, United States Navy

Chester W. Nimitz

Commander in Chief, Pacific Fleet

Backed his own codebreakers against Washington and committed all three available carriers to an ambush position on the strength of a partial decrypt. If the estimate had been wrong there was nothing behind them but the west coast.

U.S. Navy / Naval History and Heritage Command, 80-G-K-9344 · Public domain · Source
Raymond A. Spruance
Rear Admiral, United States Navy

Raymond A. Spruance

Commanding, Task Force 16

A cruiser officer given two carriers days before the battle because Halsey was in hospital. Launched at extreme range on the morning of the 4th, then declined to pursue a beaten but still powerful surface fleet into the night. Both decisions were correct and the second took more nerve.

U.S. Navy / Naval History and Heritage Command, 80-G-225341 · Public domain · Source
Frank Jack Fletcher
Rear Admiral, United States Navy

Frank Jack Fletcher

Commanding, Task Force 17 and in tactical command

Senior officer present, flying his flag in the carrier that took every Japanese blow aimed at the American fleet. Handed tactical control to Spruance once Yorktown was crippled. His conduct at Midway was competent and unglamorous and his reputation never recovered from the accounts written afterwards.

U.S. Navy / Naval History and Heritage Command, 80-G-14193 · Public domain · Source
Wade McClusky
Lieutenant Commander, United States Navy

Wade McClusky

Commanding, Enterprise air group

Found empty ocean where the enemy should have been, chose to keep searching on failing fuel, spotted a lone destroyer running north and followed her wake to the carriers. Nimitz wrote that the decision decided the battle and the fate of the Pacific Fleet.

U.S. Navy / Naval History and Heritage Command, NH 93189 · Public domain · Source
John C. Waldron
Lieutenant Commander, United States Navy

John C. Waldron

Commanding, Torpedo Squadron 8

Broke away from the rest of Hornet's air group on his own judgement of where the enemy lay, found the carriers, and attacked without escort in aircraft he had told his squadron were not good enough. All fifteen were shot down. One man of thirty survived.

US Navy · NARA · Public domain · Source
Isoroku Yamamoto
Admiral, Imperial Japanese Navy

Isoroku Yamamoto

Commander in Chief, Combined Fleet

Designed an operation that split his fleet across a thousand miles and two objectives, and then stationed himself with the battleships several hundred miles behind the carriers under radio silence, unable to see the battle or influence it.

National Diet Library, Japan · Public domain · Source
Chūichi Nagumo
Vice Admiral, Imperial Japanese Navy

Chūichi Nagumo

Commanding, First Air Fleet

Faced a genuine dilemma at 08:30 with bad information and chose to recover his aircraft rather than launch a partial unescorted strike. The decision is defensible and it left his decks occupied for the ninety minutes that mattered.

U.S. Naval History and Heritage Command, NH 63423 · Public domain · Source
Tamon Yamaguchi
Rear Admiral, Imperial Japanese Navy

Tamon Yamaguchi

Commanding, Second Carrier Division, in Hiryū

Urged an immediate strike before the rearming began and was overruled. When three carriers were burning he attacked with the one that was left and crippled Yorktown with it. Widely expected to command the Combined Fleet one day. He stayed aboard Hiryū when she was abandoned.

Unknown photographer / Ehime Prefecture Gokoku Shrine · Public domain · Source
Minoru Genda
Commander, Imperial Japanese Navy

Minoru Genda

Air staff officer, First Air Fleet

The planner behind the Pearl Harbor strike and the air operations at Midway. Argued for a larger scouting effort than the plan allowed and did not get it. After the war he commanded the Japan Air Self-Defense Force and sat in the Diet for twenty-four years.

Imperial Japanese Navy · Public domain · Source

Ships, Guns & Machines

Materiel of the operation

The aircraft decided it. The American torpedo bomber was obsolete and its crews knew it; the dive bomber was excellent and won the battle in six minutes. The Japanese fighter was the best carrier aircraft in the world in 1942 and was in the wrong place at the decisive moment.

Below the aircraft sit two less obvious machines. One is a dry dock at Pearl Harbor that put a badly damaged carrier back to sea in seventy-two hours. The other is a room full of punch card tabulators being used to grind through intercepted signals, which is the reason anybody was in position at all.

SBD Dauntless
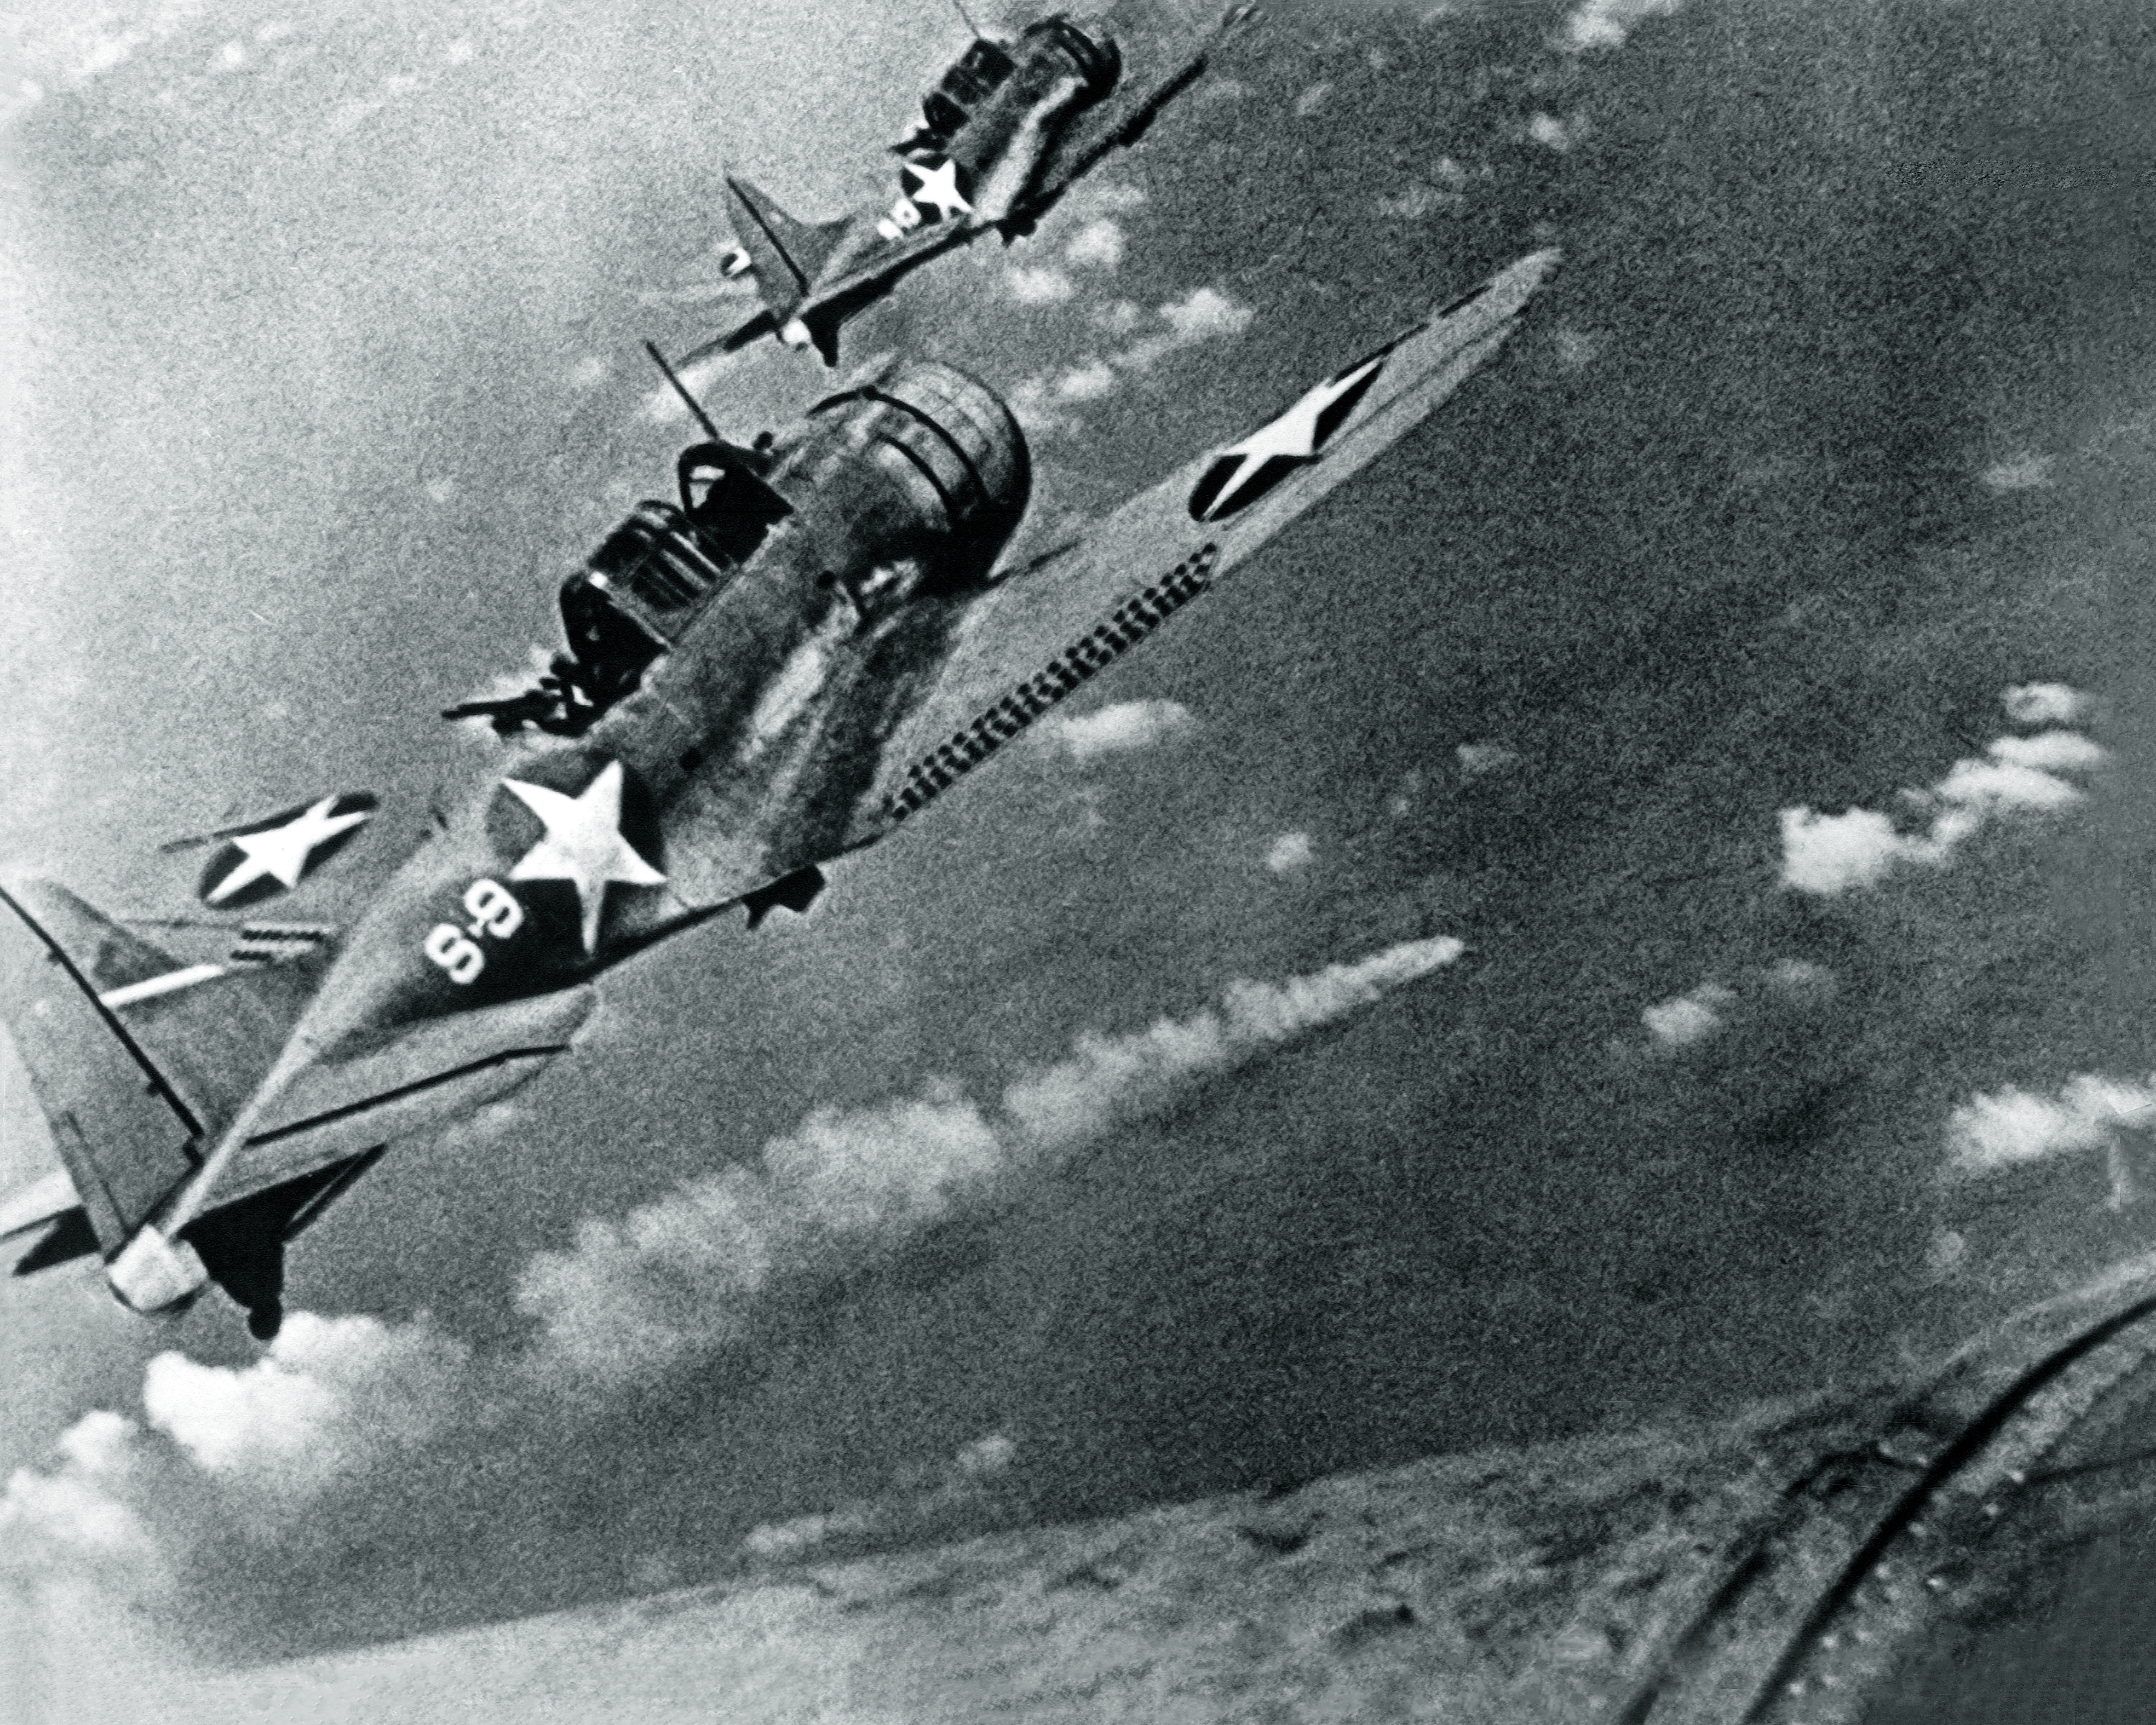
Dauntless dive bombers over the burning Mikuma, 6 June 1942.
U.S. Navy / Naval History and Heritage Command, 80-G-17054 · Public domain · Source

SBD Dauntless

Dive bomber · 1,000 lb bomb · perforated dive brakes · four carriers sunk in one day

Slow, unglamorous, and the most successful naval aircraft of the war. Its dive brakes let it come down at seventy degrees at a controllable speed, which is why its bombing was accurate enough to put four hits on a manoeuvring carrier from twenty thousand feet.

TBD Devastator
Devastators of Torpedo Squadron 6 aboard Enterprise, 1942.
U.S. Navy / Naval History and Heritage Command, 80-G-41686 · Public domain · Source

TBD Devastator

Torpedo bomber · obsolete by 1942 · 41 committed, 35 lost, 0 hits

Too slow to escape and too slow to attack from a useful angle, carrying the Mark 13 torpedo which ran deep and often failed to detonate. Every man who flew one at Midway understood this. Three squadrons went in anyway and their sacrifice pulled the Japanese fighters to sea level at the decisive moment.

A6M Zero
A6M2 "Zero" fighter (tail code A1-108) takes off from the aircraft carrier Akagi
Naval History and Heritage Command · Public domain · Source

A6M Zero

Carrier fighter · exceptional range and turn · no armour, no self-sealing tanks

The best carrier fighter in the world in June 1942 and it was in the wrong place. Drawn down to wave height chasing torpedo bombers, its pilots had neither the altitude nor the fuel to reach the dive bombers arriving above them, and the fleet's air defence had no radar to warn it.

The Japanese hangar deck
Hiryū burning and abandoned, 5 June 1942.
Oniwa Kiyoshi / Naval History and Heritage Command, NH 73064 · Public domain · Source

The Japanese hangar deck

Enclosed hangars · fuel lines charged · ordnance stacked during a weapons change

The single greatest difference between the two fleets. Japanese carriers had enclosed hangars that contained a blast instead of venting it, and at 10:22 three of them held fuelled aircraft and unstowed bombs part way through a change of armament. Each ship was destroyed by a handful of hits that an American carrier of the period would probably have survived.

USS Yorktown
Yorktown in Dry Dock Number One, Pearl Harbor, May 1942.
U.S. Navy / Naval History and Heritage Command, 80-G-13065 · Public domain · Source

USS Yorktown

Fleet carrier · damaged at Coral Sea · repaired in 72 hours · sunk 7 June

The Japanese plan counted two American carriers. Pearl Harbor's yard made it three by putting a ship the estimators had written off for three months back to sea in three days. Her aircraft killed Sōryū and Hiryū, and she absorbed every blow the Japanese aimed at the American fleet.

PBY Catalina
A PBY Catalina of the type that flew the Midway search arcs.
Cdr. John Ford, USNR / U.S. Navy · Public domain · Source

PBY Catalina

Patrol flying boat · search arcs to 700 miles · the first sighting and the first torpedo hit

Unarmoured, unhurried and indispensable. The Catalinas flying out of Midway made the first contact with the invasion force, and one of them put the only successful American torpedo of the battle into a tanker in a night attack on 4 June.

JN-25 and the tabulators

Odacir Blanco · CC BY-SA 3.0 · Source

JN-25 and the tabulators

Cryptanalysis · Station HYPO · IBM punch card machines · partial break

A room in a basement, a team working eighty hour weeks, and a bank of punch card tabulators grinding through additive tables. The break was never complete, perhaps a quarter to a third of any message, and it was enough to put three carriers in exactly the right square of ocean.

The Mark 13 torpedo

U.S. Navy / Naval History and Heritage Command, 80-G-298609 · Public domain · Source

The Mark 13 torpedo

Aerial torpedo · drop below 110 knots and 50 feet · frequently failed to run or detonate

An aerial torpedo that had to be dropped low and slow, from an aircraft that was already low and slow, and which then often broached, ran deep or failed to explode. It was not properly fixed until 1944. The torpedo bomber crews of Midway were sent to attack with a weapon their own navy knew did not work.

The Cost

Figures as proposed by the sources named

The material loss was enormously in the American favour and the human loss was too. What matters more than either is what was lost inside the ships: the trained maintenance crews, the aviation mechanics and the ordnance men who went down with them, and who could not be replaced at the rate the war would demand.

The often repeated claim that Japan lost the core of its naval aviation here is not supported by the records. Japanese aircrew losses at Midway were around 110. The aircrew were destroyed later, at Guadalgardnal and in the Solomons through 1942 and 1943, in a campaign of attrition that gets a fraction of the attention.

Four carriers

Japanese ships lost

Akagi, Kaga, Sōryū and Hiryū, with the heavy cruiser Mikuma. Around 248 aircraft went down with them or were lost in the air.

Proposed by Parshall and Tully, Shattered Sword, 2005

About 3,057

Japanese dead

Including the ships' engineering, maintenance and ordnance crews, whose loss mattered more to the Japanese navy than the aircrew.

Proposed by Parshall and Tully, Shattered Sword, 2005

About 362

American dead

With the carrier Yorktown, the destroyer Hammann and roughly 150 aircraft. Of the three torpedo squadrons, 35 of 41 aircraft were lost.

Proposed by Naval History and Heritage Command action reports

About 110

Japanese aircrew lost

Far fewer than the popular account implies. Japanese naval aviation was destroyed over the following eighteen months in the Solomons, not here.

Proposed by Parshall and Tully, Shattered Sword, 2005

Sources & Archives

External links open the holding institution

The standard modern account is Jonathan Parshall and Anthony Tully's Shattered Sword, which worked from Japanese primary records and dismantled several claims that had stood since the 1950s, including the story that the Japanese carriers were minutes from launching a counterstrike when they were hit. Samuel Eliot Morison's volume remains the American operational narrative.

The Naval History and Heritage Command holds the action reports and the photographic record. Times given here are local, and differ by an hour or more between American and Japanese accounts of the same events, which is worth remembering when comparing chronologies.

  1. Shattered Sword: The Untold Story of the Battle of Midway, Jonathan Parshall and Anthony Tully, 2005Potomac Books
  2. History of United States Naval Operations in World War II, volume IV, Coral Sea, Midway and Submarine Actions, Samuel Eliot Morison, 1949US Navy
  3. Battle of Midway action reports and after-action documentsNaval History and Heritage Command
  4. The role of communications intelligence at Midway, Station HYPO recordsNational Security Agency, Center for Cryptologic History
  5. Battle of Midway photographic collectionNARA and Naval History and Heritage Command
  6. Japanese Monograph series, Midway OperationsUS Army Center of Military History and Japanese Demobilization Bureau
  7. Midway Atoll National Wildlife Refuge and Battle of Midway National MemorialUS Fish and Wildlife Service
  8. The wrecks of Kaga and Akagi, located 2019Vulcan Inc. Research Vessel Petrel and NHHC
  9. United States Pacific Fleet operational records, CINCPAC filesUS National Archives and Records Administration
  10. Marine Aircraft Group 22 and the Midway garrisonUS Marine Corps History Division
Operation chronologyDates, locations and sourced event summaries
DateEventLocationSummary
Monday 18 May 1942 · Three weeks beforeAF is MidwayStation HYPO, Pearl Harbor

Station HYPO had been reading enough of the Japanese fleet code to know a major operation was coming against a target the signals called AF. Washington thought AF was somewhere else. Commander Joseph Rochefort's team proposed a test: have Midway transmit in the clear that its fresh water distillation plant had broken down.

Sources 1, 4
Tuesday 26 May 1942 · Nine days beforeNimitz sets the ambushCINCPAC headquarters, Pearl Harbor

Nimitz accepted HYPO's estimate against contrary advice from Washington and ordered his carriers to a position north-east of Midway that the Japanese plan assumed would be empty. It was designated Point Luck.

Sources 1, 2, 9
Wednesday 27 May 1942 · Eight days beforeYorktown in seventy-two hoursDry Dock Number One, Pearl Harbor

Yorktown came into Pearl Harbor down by the stern and leaking oil after Coral Sea, with damage the yard estimated at three months. She was dry-docked, patched, shored and back at sea in seventy-two hours with fourteen hundred workmen still aboard as she sailed.

Sources 1, 2, 3
Wednesday 27 May 1942 · Eight days beforeKidō Butai sailsHashirajima, Hiroshima Bay

The First Air Fleet left Hiroshima Bay with Akagi, Kaga, Sōryū and Hiryū. Two of the six carriers that had struck Pearl Harbor were absent, one damaged and one short of aircrew after Coral Sea, so the strike force went to sea at two thirds strength.

Sources 1, 6
Wednesday 3 June 1942 · D minus 1The AleutiansDutch Harbor, Alaska

Carrier aircraft struck Dutch Harbor in the Aleutians, and Japanese troops occupied Attu and Kiska. It is usually described as a diversion intended to draw the American fleet north.

Sources 1, 6
Wednesday 3 June 1942 · 09:00The first sightingSix hundred miles west of Midway

A PBY Catalina flying a search arc out of Midway reported the invasion transport group approaching from the west. B-17s attacked from Midway that afternoon and hit nothing, which was the first of many attacks from the atoll that hit nothing.

Sources 2, 3, 10
Thursday 4 June 1942 · 04:30The strike launches, and a scout is lateKidō Butai, 240 miles north-west of Midway

One hundred and eight aircraft left the four carriers for Midway. At the same time seven scouting aircraft went out to search the sectors to the east, where the Americans would be if they were anywhere.

Sources 1, 6
Thursday 4 June 1942 · 06:20Midway is bombedMidway Atoll

The strike hit the atoll, destroying installations and shooting down most of the obsolete Marine fighters sent up against it. The runway was left usable, which was the one thing that mattered.

Sources 2, 10
Thursday 4 June 1942 · 07:05Midway's aircraft attackOver Kidō Butai

Every flyable aircraft on Midway went at the Japanese carriers in a series of uncoordinated attacks: Marine dive bombers, Army B-26s carrying torpedoes, B-17s bombing from high level. They lost heavily and did not score a single hit.

Sources 1, 2, 10
Thursday 4 June 1942 · 07:15Nagumo orders the reserve rearmedAkagi

The reserve strike aircraft had been held ready with torpedoes and armour-piercing bombs in case American ships appeared. With no ships reported and Midway needing a second blow, Nagumo ordered them rearmed with land attack bombs.

Sources 1, 6
Thursday 4 June 1942 · 07:28Ten ships, no carrier mentionedTone's number four scout

The late scout reported ten American ships to the east. It gave no composition, and Nagumo spent the next fifty minutes not knowing whether he was facing cruisers or carriers.

Sources 1, 6
Thursday 4 June 1942 · 08:30The decks are cleared to recoverKidō Butai

Nagumo chose to land the returning Midway strike before launching anything at the American ships, rather than send a partial and unescorted attack. The alternative was to leave a hundred aircraft to ditch in the sea.

Sources 1, 6
Thursday 4 June 1942 · 09:20Torpedo Squadron 8Over Kidō Butai

Fifteen TBD Devastators from Hornet found the carriers without fighter escort and attacked. Every aircraft was shot down. Of thirty crew, one survived: Ensign George Gay, who spent the rest of the day in the water under a seat cushion watching the battle.

Sources 1, 2, 3
Thursday 4 June 1942 · 09:38Torpedo Squadron 6Over Kidō Butai

Fourteen aircraft from Enterprise attacked next. Ten were shot down. No hits.

Sources 1, 2
Thursday 4 June 1942 · 10:00Torpedo Squadron 3Over Kidō Butai

Twelve aircraft from Yorktown made the third attack in forty minutes. Ten were lost. Again no hits. Three squadrons had now attacked, forty-one aircraft had been committed, and the score against four carriers was nothing.

Sources 1, 2, 3
Thursday 4 June 1942 · 10:05McClusky follows a destroyerEnterprise air group, searching

Lieutenant Commander Wade McClusky, leading Enterprise's dive bombers, reached the expected position and found empty ocean. Low on fuel, he chose to continue searching rather than turn back, spotted the destroyer Arashi hurrying north after depth-charging a submarine, and followed her wake.

Sources 1, 2, 3
Thursday 4 June 1942 · 10:22KagaKaga

McClusky's Dauntlesses fell on Kaga out of a clear sky with no fighters above her. Four bombs hit, one on the bridge killing the captain and most of the command staff, others among fuelled and armed aircraft on the hangar deck.

Sources 1, 3, 8
Thursday 4 June 1942 · 10:25SōryūSōryū

Yorktown's dive bombers under Lieutenant Commander Maxwell Leslie arrived at almost the same minute from a different bearing, having navigated to the fleet independently. Three bombs hit Sōryū and she was ablaze within minutes.

Sources 1, 3
Thursday 4 June 1942 · 10:26AkagiAkagi

A single bomb from a section of McClusky's group hit Akagi near the middle lift, among armed aircraft. A second was a near miss that jammed her rudder. The flagship of the Pearl Harbor strike was out of the battle within minutes and scuttled the following morning.

Sources 1, 3, 8
Thursday 4 June 1942 · 10:40The five minutes that did not happenKidō Butai

The famous account has the Japanese carriers minutes from launching a fully armed counterstrike when the bombs arrived, so that the battle turned on five minutes. It comes from a 1955 memoir and it dominated the English language literature for fifty years.

Sources 1, 6
Thursday 4 June 1942 · 12:05Hiryū strikes backUSS Yorktown

Hiryū, undamaged and now alone, launched eighteen dive bombers under Rear Admiral Yamaguchi. They found Yorktown, and three bombs got through, stopping her engines and leaving her dead in the water.

Sources 1, 2, 3
Thursday 4 June 1942 · 14:30Two torpedoesUSS Yorktown

Hiryū's second strike, ten torpedo bombers, put two torpedoes into Yorktown's port side. She lost power, took on a heavy list and was abandoned that evening.

Sources 2, 3
Thursday 4 June 1942 · 17:00HiryūHiryū

Enterprise launched a mixed group including Yorktown's orphaned dive bombers. They found Hiryū in the late afternoon and hit her four times forward, wrecking the flight deck and starting fires that could not be contained.

Sources 1, 3
Friday 5 June 1942 · 02:55Yamamoto cancels the operationThe Japanese fleet

Yamamoto briefly considered pressing on with a night surface action, then accepted that with no carriers and no air cover a battleship force in daylight within range of Midway was a liability. The occupation was cancelled and the fleet turned west.

Sources 1, 6
Friday 5 June 1942 · EveningSpruance declines the night pursuitTask Force 16

Spruance turned east during the night rather than chase a defeated but numerically superior surface fleet into the dark, where Japanese night gunnery and torpedoes would have been decisive.

Sources 1, 2
Saturday 6 June 1942 · MiddayMikumaMikuma and Mogami

Two heavy cruisers had collided while manoeuvring to avoid a submarine in the dark. Aircraft from Enterprise and Hornet found them and reduced Mikuma to a burning wreck. She sank that evening; Mogami survived and reached Truk.

Sources 2, 3, 5
Sunday 7 June 1942 · 13:30I-168 finds YorktownUSS Yorktown under tow

The submarine I-168 penetrated the destroyer screen and put two torpedoes into Yorktown and one into the destroyer Hammann, lying alongside to supply power to the salvage party. Hammann broke in half and sank in four minutes.

Sources 2, 3
Sunday 7 June 1942 · The accountWhat it costThe Central Pacific

Japan lost four fleet carriers, a heavy cruiser, around 248 aircraft and about 3,057 men. The United States lost one carrier, one destroyer, around 150 aircraft and about 362 men.

Sources 1, 2, 3
After the battle · AfterRochefort is sent to a dry dockWashington and Pearl Harbor

Nimitz recommended Joseph Rochefort for the Distinguished Service Medal. Washington blocked it. The naval communications establishment in the capital, which had backed the wrong estimate, took the credit for the Midway intelligence, and Rochefort was reassigned in late 1942 to command a floating dry dock in San Francisco.

Sources 1, 4
The reckoning · AfterWhat Midway did and did not decideThe Pacific

Midway ended the Japanese offensive phase and removed the striking force that had run unchecked from Hawaii to Ceylon in six months. After it, Japan never again mounted a carrier operation of that weight, and the initiative in the Pacific passed permanently to the United States.

Sources 1, 2

Image rights. Photographs credited to the US Navy, US Marine Corps and NARA are works of the United States federal government and are in the public domain. Japanese photographs are reproduced from collections where the term of copyright has expired. Where an image slot is unfilled the archive reference stands in its place pending a rights check. Longitudes west of the dateline are expressed beyond minus 180 so the map pans the short way across the Pacific rather than the long way round the globe.