Skip to content
WW2 Theatres Theatres of the Second World War
Home / The Opening Campaigns / Dunkirk Evacuation: Operation Dynamo
British troops rescued in a ship at Dunkirk (France, 1940).

Dunkirk: Operation Dynamo

26 May to 4 June 1940 · Dunkirk, Flanders and the English Channel · Nine days

Follow Operation Dynamo from the decision to evacuate the Allied armies trapped in northern France to the final sailings from Dunkirk on 4 June 1940. The timeline explains how the perimeter was defended, why the East Mole became the main embarkation point, how naval vessels and smaller craft moved 338,226 troops, what the RAF fought above the beaches and why the evacuation saved an army without reversing the defeat in France.

Divide and Conquer (Why We Fight #3) directed by Frank Capra

This event sits inside Battle of France 1940, where it appears as a single entry. This page carries it in full.

BACK TO BATTLE OF FRANCE 1940
OPERATION DYNAMO
26 May to 4 June 1940Nine days of evacuation from Dunkirk harbour and the beaches east of the town
TROOPS EVACUATED
338,226British, French and other Allied military personnel evacuated during Operation Dynamo
FROM THE BEACHES
Nearly 100,000Most of the remaining troops embarked through Dunkirk harbour, principally from the East Mole
BRITISH SHIPS ASSEMBLED
765Warships, merchant vessels, fishing boats and other craft recorded by the British official history
ROYAL NAVY DESTROYERS LOST
SixMore than 200 British and Allied craft of all types were sunk during the operation
Marker affiliation Allied Axis Other / contested
Map layers

01 / 27

Why Were Allied Troops Trapped at Dunkirk?

The German breakthrough to the Channel separated the northern Allied armies from the rest of France

German armoured forces crossed the Meuse, broke through the French front and reached the Channel at Abbeville on 20 May. The British Expeditionary Force, the Belgian Army and major French formations were left north of the German corridor with their former supply bases and communications cut.

Dunkirk offered a port, long shallow beaches and access to the English Channel, but it was not an ideal evacuation site. Large ships could not approach the gently shelving shore. The harbour had been bombed, the normal entrances were threatened by mines and artillery, and German forces were closing from the west, south and east.

The evacuation depended on a perimeter extending through canals, flooded ground, villages and dunes around the town. British and French units had to hold this perimeter while other troops moved to the harbour or beaches. The shrinking front made the defence shorter, but it also brought German artillery closer to the embarkation areas.

How Did Operation Dynamo Evacuate 338,226 Troops?

A defended perimeter, naval control, the East Mole, small craft and air cover

Vice-Admiral Bertram Ramsay directed the naval operation from tunnels beneath Dover Castle. Captain William Tennant coordinated embarkation at Dunkirk, while Lieutenant-General Ronald Adam organised the British bridgehead and later Major-General Harold Alexander commanded the final British rearguard.

The open beaches were too shallow for destroyers and transports. Small boats ferried soldiers to larger vessels, but the faster solution was the East Mole, a breakwater not designed as a pier. Tennant found that destroyers and passenger ships could berth alongside it, and most of the evacuation eventually passed through the harbour.

The result also depended on the troops who held the perimeter. British divisions defended much of the eastern and southern sectors during the first phase. French troops held the western sector and covered the evacuation after most British formations had embarked. Belgian resistance delayed German forces until the Belgian capitulation on 28 May.

Bertram Ramsay
Vice-Admiral, Royal Navy

Bertram Ramsay

Naval commander, Operation Dynamo

Directed the evacuation from Dover and coordinated warships, merchant vessels, Channel routes and embarkation priorities. His staff expanded a contingency plan for a limited lift into an operation that removed more than 338,000 troops.

Imperial War Museums, TR 2626 · Public domain · Source
John Vereker, Lord Gort
General, British Army

John Vereker, Lord Gort

Commander-in-Chief, British Expeditionary Force

Abandoned the attempt to mount a major southward counteroffensive and redirected the BEF toward Dunkirk. He organised the withdrawal into the bridgehead and left for England on 31 May after handing final command to Alexander.

Imperial War Museums, O 357 · Public domain · Source
William Tennant
Captain, Royal Navy

William Tennant

Senior Naval Officer, Dunkirk

Controlled embarkation at the harbour and beaches. He recognised that vessels could berth at the East Mole and turned the breakwater into the operation's main loading point while coordinating beach parties, signals and ship movements.

Imperial War Museums, A 29072 · Public domain · Source
Ronald Adam
Lieutenant-General, British Army

Ronald Adam

Commander of the Dunkirk bridgehead

Organised the British perimeter and traffic system during the first evacuation phase. His work separated the defensive battle from the movement of formations toward the embarkation areas.

Imperial War Museums, Art.IWM ART LD 404 · Public domain · Source
Harold Alexander
Major-General, British Army

Harold Alexander

Final British rearguard commander

Assumed command after Gort left and coordinated the final British withdrawal with Admiral Jean-Marie Abrial. He remained until the organised British rearguard had embarked.

Library and Archives Canada, MIKAN 4233815 · Public domain · Source
Jean-Marie Abrial
Vice-Amiral, French Navy

Jean-Marie Abrial

Admiral North and commander at Dunkirk

Held overall French responsibility for the Dunkirk fortified area and worked with British commanders over defence and embarkation. French troops and ships continued the operation after most British formations had left.

Agence Rol / Bibliothèque nationale de France, Gallica · Public domain · Source
Keith Park
Air Vice-Marshal, Royal Air Force

Keith Park

Air Officer Commanding, No. 11 Group

Directed much of the Fighter Command effort over Dunkirk and the Channel approaches. His squadrons had to balance protection of the evacuation with range, fuel, weather and simultaneous threats to southern England.

Royal Air Force official photographer · Imperial War Museums, CM 5631 · Public domain · Source
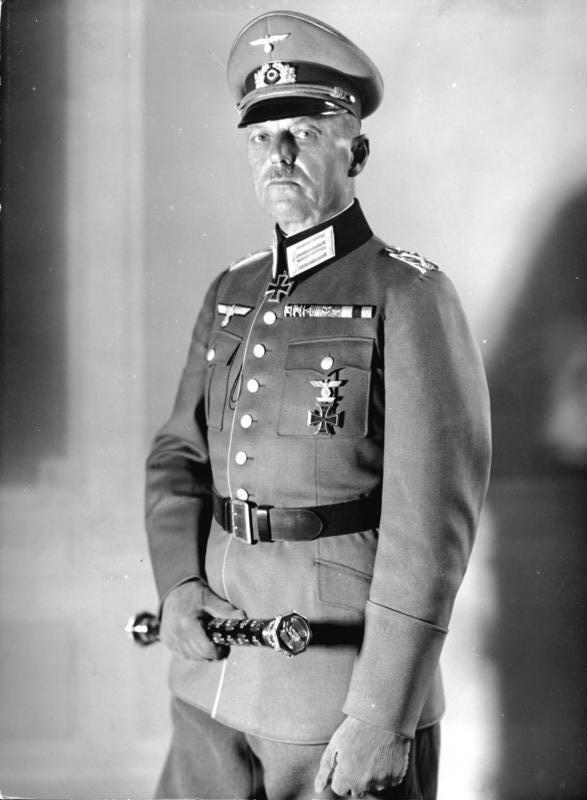
Gerd von Rundstedt
Generaloberst, Germany

Gerd von Rundstedt

Commanding, Army Group A

Ordered the armoured formations to halt and close up on 23 May because of flank concerns, unit condition and preparations for further operations. Hitler endorsed the order on 24 May, and Rundstedt maintained the pause until the attack resumed.

Bundesarchiv Bild 183-L08129 · CC BY-SA 3.0 DE · Source
Georg von Küchler
Generaloberst, Germany

Georg von Küchler

Commanding, Eighteenth Army

Eighteenth Army assumed responsibility for reducing the Dunkirk bridgehead as German forces closed from Belgium and the east. Its infantry and artillery continued compressing the perimeter during the final evacuation days.

Bundesarchiv Bild 183-R63872 · CC BY-SA 3.0 DE · Source
Wolfram von Richthofen
General der Flieger, Germany

Wolfram von Richthofen

Commanding, VIII Air Corps

Directed concentrated Luftwaffe support against Allied ground positions, harbour facilities and shipping. Air attacks caused heavy losses but did not prevent the evacuation from operating at night, in poor weather and under RAF cover.

Bundesarchiv Bild 183-J1005-0502-001 · CC BY-SA 3.0 DE · Source

What Ships and Aircraft Were Used During the Dunkirk Evacuation?

Destroyers, ferries, minesweepers, small boats, fighters and dive bombers

The evacuation fleet included destroyers, sloops, minesweepers, passenger ferries, hospital ships, trawlers, drifters, barges, lifeboats and motor boats. Destroyers carried more troops than any other vessel category, while smaller craft moved men from the beaches and shallow water to ships offshore.

The Royal Air Force protected the perimeter, harbour, beaches and sea routes from bases in southern England. Hurricanes and Spitfires fought German fighters and bombers, while Bomber Command and the Air Component attacked German ground forces and bridges threatening the bridgehead.

The Luftwaffe used Ju 87 dive bombers, twin-engine bombers and Bf 109 fighters against ships, troops and harbour facilities. Weather, smoke, distance from English airfields and the need to defend several locations prevented continuous RAF cover, which is why many soldiers on the beaches believed no fighters were present.

HMS Wakeful

Imperial War Museums, HMS Wakeful (1943) · Public domain · Source

HMS Wakeful

Royal Navy · W-class destroyer · 4-inch guns and torpedoes

Wakeful made evacuation runs before being torpedoed by the German fast attack boat S-30 on 29 May. The destroyer sank rapidly with heavy loss of life.

HMS Shikari

Imperial War Museums, FL 5438 · Public domain · Source

HMS Shikari

Royal Navy · S-class destroyer · completed after the First World War

Shikari took part in the final organised lift and left Dunkirk after embarking 383 French troops. The official history records it as the last ship to depart during Operation Dynamo.

Mona's Queen
The Isle of Man steam ferry SS Mona's Queen sinking after striking a mine off Dunkirk, 29 May 1940.
Imperial War Museums, HU 1145 · Public domain · Source

Mona's Queen

Isle of Man Steam Packet passenger vessel · requisitioned troop transport

The ferry carried troops during Dynamo and struck a mine on 29 May while approaching Dunkirk. Its loss illustrates the danger from mined channels as well as air and surface attack.

Medway Queen

HMS

Medway Queen

Thames paddle steamer · requisitioned as a minesweeper and evacuation vessel

Medway Queen made repeated Channel crossings, embarked troops and used its anti-aircraft armament during air attacks. Paddle steamers and passenger vessels offered shallow draft and large carrying capacity.

Sundowner

Photo: Stavros1 · CC BY 3.0 · Source

Sundowner

Private motor yacht · approximately 58 feet long

Former naval officer Charles Lightoller took Sundowner to Dunkirk with a small crew and returned carrying about 130 people. The yacht represents the privately owned craft that worked within a naval operation rather than an independent civilian rescue.

Supermarine Spitfire Mk I

Imperial War Museums, A 28812 · Public domain · Source

Supermarine Spitfire Mk I

United Kingdom · single-seat fighter · eight .303-inch machine guns

Spitfire squadrons flew from southern England to engage German fighters and bombers over the perimeter and Channel. Their limited time over Dunkirk made interception timing and ground control critical.

Hawker Hurricane Mk I
A Hawker Hurricane Mark I night fighter of No. 85 Squadron RAF taxiing by the light of a flare at Debden, Essex, before taking off to intercept night raiders.
Imperial War Museums, CH 2250 · Public domain · Source

Hawker Hurricane Mk I

United Kingdom · single-seat fighter · eight .303-inch machine guns

Hurricanes formed a large part of Fighter Command's available strength and fought over both the evacuation routes and the inland perimeter. Many pilots had already been engaged continuously during the Battle of France.

Messerschmitt Bf 109Ea
Messerschmitt Bf 109 E-1, Staff/II. JG 54 (Stab/II. Gruppe, Jagdgeschwader 54), with the angle of the group adjutant.
Bundesarchiv Bild 101I-058-1784A-14 · CC BY-SA 3.0 DE · Source

Messerschmitt Bf 109Ea

Germany · single-seat fighter · cannon and machine-gun armament

The Bf 109E escorted bombers and contested RAF cover over Dunkirk. Its shorter distance from captured continental airfields gave German pilots more time over the battlefield than fighters operating from England.

Junkers Ju 87B
A German Junkers Ju 87B Stuka (TD+AY) dropping bombs
Royal Air Force · Public domain · Source

Junkers Ju 87B

Germany · single-engine dive bomber · precision attack aircraft

Ju 87 formations attacked ships, the harbour, road junctions and troops within the perimeter. The aircraft was highly effective where fighter opposition and anti-aircraft fire were limited.

Heinkel He 111H
A German Heinkel He 111H bomber over Britain.
Royal Air Force · Public domain · Source

Heinkel He 111H

Germany · twin-engine medium bomber · bomb and torpedo variants

He 111 units attacked shipping and embarkation areas in larger formations and from higher altitude than the dive bombers. Smoke, cloud and RAF interception reduced the consistency of these attacks.

What Did the Dunkirk Evacuation Save and What Was Left Behind?

The personnel returned, but the campaign remained a military defeat

Operation Dynamo evacuated 338,226 troops, including large numbers of French and other Allied soldiers. Nearly 100,000 embarked from the beaches; the majority left through the harbour and East Mole. French naval vessels and crews contributed, and French troops defended the perimeter during the last phase.

The British Expeditionary Force left most of its tanks, artillery, vehicles, ammunition and stores in France. Replacing that equipment became an immediate British priority. Thousands of Allied troops who could not reach the ships were captured when the perimeter fell.

More than 200 British and Allied craft were sunk and a similar number damaged. Fighter Command lost more than 100 aircraft to enemy action during Dynamo, while the Luftwaffe also suffered substantial losses. The operation preserved trained personnel, but France remained under attack and the wider campaign continued after Dunkirk.

338,226

Allied troops evacuated

The Operation Dynamo total includes British, French and other Allied military personnel removed between 26 May and 4 June.

Proposed by British official history and Ramsay's Operation Dynamo despatch

Nearly 100,000

Evacuated from the beaches

The majority of the remaining evacuees embarked through Dunkirk harbour, particularly from the East Mole.

Proposed by Ellis, The War in France and Flanders

More than 200

British and Allied craft sunk

A similar number were damaged; the losses included six Royal Navy destroyers.

Proposed by Royal Navy Historical Branch

2,472 guns

British guns lost in the French campaign

All artillery and most vehicles and stores reaching the coast had to be destroyed or abandoned; the figure covers the wider 1940 campaign, not Dynamo alone.

Proposed by Ellis, The War in France and Flanders, campaign equipment returns

Books & Relics

The authenticity of the relics is not verified by WW2 Theatres.

This collection is curated by WW2 Theatres and not affiliated with our website, with all site photographs licensed to their respective owners.

How Was This Dunkirk Evacuation Timeline Researched?

Official army, naval and air histories supported by British, French and Belgian records

The land chronology follows the British official history of the campaign in France and Flanders. Naval organisation, ship movements and totals are checked against Ramsay's published despatch and Roskill's official naval history. RAF operations and losses follow the official air history and RAF Museum research.

French participation is checked against the French Ministry of the Armed Forces and Service historique de la Défense. Belgian decisions are checked against the official Belgian account. Where later retellings simplify the armoured halt, the little ships or the absence of air cover, this page follows the contemporary orders and service records instead.

The interactive geography uses the United States Military Academy map of the situation on 4 June and operations since 21 May as the benchmark for the 21 May front, the 26 May withdrawal, the defensive perimeter established on 28 May and the final German entry into Dunkirk. Its broad pink campaign wash is not reproduced as an Axis-control polygon because it describes the operational advance rather than a precise surveyed boundary.

  1. The War in France and Flanders 1939–1940, Chapters IX–XVI and Supplement, L. F. EllisUnited Kingdom Military Series
  2. Despatch on Operation Dynamo, the evacuation from Dunkirk, Vice-Admiral Sir Bertram RamsayThe London Gazette, No. 38017
  3. The War at Sea 1939–1945, Volume I: The Defensive, S. W. RoskillUnited Kingdom Military Series
  4. Dunkirk evacuation collections and historical overviewImperial War Museums
  5. The RAF's role in the evacuation of DunkirkRoyal Air Force Museum
  6. Operation Dynamo naval, army and air recordsThe National Archives, Kew
  7. The Battle of Dunkirk, 28 May to 4 June 1940French Ministry of the Armed Forces, Chemins de mémoire
  8. First Army and Dunkirk bridgehead operational recordsService historique de la Défense
  9. Belgium: The Official Account of What Happened, 1939–1940Belgian Ministry of Foreign Affairs
  10. Operation Dynamo and Royal Navy vessel lossesRoyal Navy Historical Branch
  11. Northwestern Europe, 1940: Campaign in the West, Situation 4 June and Operations Since 21 May, History Department, United States Military AcademyWikimedia Commons · Public domain
  12. Northwestern Europe, 1940: situation 4 June and operations since 21 May, History Department, United States Military AcademyWikimedia Commons · Public domain U.S. federal work · military annotations and colour washes removed · georeferenced for this site
Operation chronologyDates, locations and sourced event summaries
DateEventLocationSummary
Sunday 19 May 1940 · Contingency planningRamsay is ordered to prepare a possible evacuationDover Castle

The War Office and Admiralty began planning for the possible evacuation of a large force from the French coast as the German breakthrough widened.

Sources 1, 2, 3
Monday 20 May 1940 · German forces reach the seaThe German advance reaches the ChannelAbbeville

German armoured formations reached the Somme estuary near Abbeville and cut the principal land communications between the Allied armies in the north and the rest of France.

Sources 1
Tuesday 21 May 1940 · CounterattackThe Allied counterattack Battle Of Arras unsettles the German commandArras

British and French forces attacked south of Arras and temporarily disrupted elements of the German advance.

Sources 1
Thursday 23 May 1940 · Army Group A orderRundstedt orders the armoured forces to halt and close upAire–Saint-Omer–Gravelines canal line

Army Group A ordered the mobile formations to stop on the canal line while the command secured its flanks, repaired units and brought infantry forward.

Sources 1
Friday 24 May 1940 · Hitler visits Army Group AHitler endorses the armoured haltArmy Group A headquarters

Hitler approved Rundstedt's decision and countermanded an army-command arrangement that would have placed the mobile forces under Army Group B.

Sources 1
Saturday 25 May 1940 · Change of directionGort turns the British Expeditionary Force toward DunkirkYpres

Lord Gort concluded that the planned Allied counteroffensive to the south could not be mounted with the forces and communications available.

Sources 1
Sunday 26 May 1940 · Calais isolatedThe Calais garrison continues fightingCalais

British and French troops at Calais were ordered to continue the defence rather than evacuate. The garrison surrendered later on 26 May after fighting inside the town and citadel.

Sources 1
Sunday 26 May 1940 · 18:57Operation Dynamo is orderedDover Castle

The Admiralty ordered the evacuation to begin under Ramsay's direction. Destroyers, transports, minesweepers and other vessels were assigned to Dunkirk.

Sources 1, 2, 3
Monday 27 May 1940 · Senior naval officer arrivesWilliam Tennant finds the harbour damaged but usableDunkirk harbour

Captain William Tennant arrived to control embarkation at Dunkirk. Bombing and wrecks had made the normal harbour facilities unreliable.

Sources 1, 2, 3
Monday 27 May 1940 · Harbour and town attackedLuftwaffe attacks damage the port and townDunkirk

German aircraft attacked the harbour, railway facilities, shipping and troops moving toward the coast. Fires and smoke spread through the town.

Sources 1, 5
27–30 May 1940 · Rearguard battleThe Cassel garrison holds the southern approachCassel

British units around Cassel and nearby villages delayed German forces advancing toward the Dunkirk perimeter.

Sources 1
By midnight, 27 May 1940 · First-day totalThe first day removes 7,669 troopsDover and Channel ports

The first full evacuation effort produced a modest total because harbour use had been disrupted and the small-craft system was not yet in place.

Sources 1, 2
Tuesday 28 May 1940 · Belgian capitulationThe Belgian Army ceases resistanceBelgian front

King Leopold III accepted the capitulation of the Belgian forces after eighteen days of fighting.

Sources 1, 9
Tuesday 28 May 1940 · Prisoners murderedSS troops murder British and French prisoners near WormhoutWormhout and Esquelbecq

Members of the Leibstandarte SS Adolf Hitler captured soldiers during the fighting south of the perimeter and forced groups into and around a barn near Esquelbecq.

Sources 1, 6
Tuesday 28 May 1940 · Small craft system expandsSmall craft begin moving troops from the shallow beachesBray-Dunes and the eastern beaches

Naval authorities assembled motor boats, lifeboats, fishing vessels, barges and other shallow-draft craft to ferry soldiers from the shore to ships waiting offshore.

Sources 1, 2, 3, 4
Wednesday 29 May 1940 · East Mole loadingThe East Mole becomes the principal embarkation pointDunkirk East Mole

Although designed as a breakwater rather than a passenger pier, the East Mole allowed destroyers and larger vessels to berth in deeper water.

Sources 1, 2, 3
Wednesday 29 May 1940 · Heavy naval lossesMines, torpedoes and air attacks strike the evacuation fleetDunkirk approaches

The destroyer Wakeful was torpedoed and sank with heavy loss of life. Grafton was then torpedoed while assisting survivors, and Grenade was sunk by air attack in Dunkirk harbour.

Sources 2, 3, 10
By midnight, 30 May 1940 · Four-day totalThe evacuation total reaches 126,606Dover

By midnight on 30 May, 126,606 troops had reached England during Dynamo.

Sources 1, 2
Friday 31 May 1940 · Lille pocketFrench First Army formations continue fighting at LilleLille

French troops encircled around Lille resisted several German divisions while the Dunkirk evacuation continued farther north.

Sources 1, 7, 8
Friday 31 May 1940 · Change of commandGort leaves and Alexander takes command of the British rearguardDunkirk perimeter

The British government ordered Lord Gort to return to England. Major-General Harold Alexander assumed command of the remaining British forces in the perimeter.

Sources 1
Saturday 1 June 1940 · Major daylight attacksGerman air attacks intensify as the perimeter contractsDunkirk harbour and beaches

Large Luftwaffe formations attacked shipping, the harbour, the beaches and troops moving toward embarkation points.

Sources 1, 5
Saturday 1 June 1940 · Destroyers lostKeith, Basilisk and Havant are lostDunkirk roads and harbour

German air attacks sank or disabled several destroyers during the day's evacuation work, including Keith, Basilisk and Havant.

Sources 2, 3, 10
Saturday 1 June 1940 · Final British withdrawal plannedThe remaining British divisions move toward the beachesEastern perimeter

About 39,000 members of the British Expeditionary Force remained inside the contracted sector at the start of the day.

Sources 1
Sunday 2 June 1940 · Night evacuationThe British rearguard is evacuatedLa Panne and Dunkirk

The remaining organised British formations withdrew through the perimeter and embarked during the night of 2–3 June.

Sources 1, 2, 7
Monday 3 June 1940 · Final planned liftThe final major French evacuation beginsDunkirk East Mole

Destroyers, passenger vessels and smaller craft entered the harbour for the last scheduled night of Operation Dynamo.

Sources 1, 2, 3, 7
Tuesday 4 June 1940 · 03:18HMS Shikari leaves with the final organised liftDunkirk

Shikari embarked 383 French troops and was the last ship to leave Dunkirk during the organised evacuation.

Sources 1, 2
Tuesday 4 June 1940 · MorningThe remaining defenders surrenderDunkirk

German forces entered the remaining bridgehead after the evacuation ended. French troops who had not reached the ships were captured.

Sources 1, 7, 8

Image rights and editorial standard. Every image used on the page must have a verified subject, date, location or archival context, holding institution and licence. Embedded photographs in this file were checked against their Wikimedia Commons file records; events without a sufficiently exact, rights-clean match remain unillustrated. The map geometry is benchmarked against the United States Military Academy map ‘Northwestern Europe, 1940: Situation 4 June and Operations Since 21 May’, available on Wikimedia Commons as a public-domain U.S. federal work. Interactive front lines and arrows are simplified editorial tracings for campaign-scale explanation, not survey boundaries. Times use local continental time where the record supports an exact time.